iCyberDefend Detection and Attack Lab: Part I
nDetection and Attack Lab
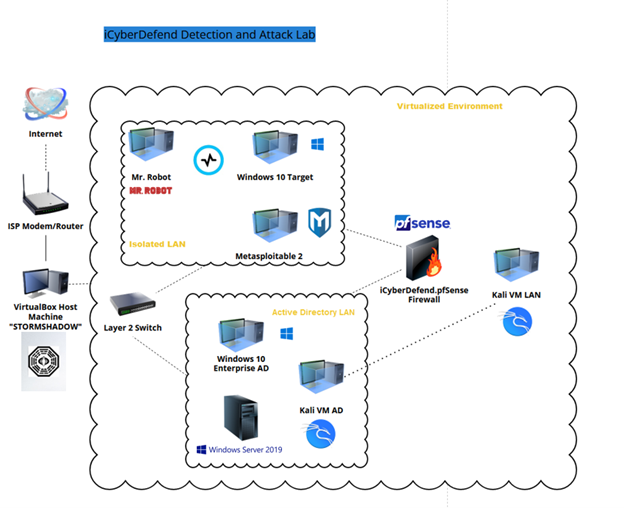
Through the steps taken, we successfully built a scalable, virtualized cybersecurity lab—the iCyberDefend Detection and Attack Lab—designed for penetration testing, attack simulations, and threat detection. This lab features a wide-area network (WAN), local area network (LAN), attacking host, three vulnerable target hosts, a Layer 2 switch, an Active Directory host, Graylog SIEM, and a pfSense firewall—all securely configured before installing host OS with hardened network settings.
Key capabilities include:
- Penetration Testing & Attack Simulations
- Threat Detection using SIEMs, Sysmon Event Viewer, and Graylog
- Vulnerability Scanning with Tenable Nessus
- Network Topology Mapping via GNS3 & Visual Paradigm Online
All virtual machines were deployed using VirtualBox Manager with the latest VirtualBox Extension Pack, though VMware and Hyper-V are also viable alternatives. Whether you’re an ethical hacker, security analyst, or researcher, this lab offers a robust environment for real-world cybersecurity training and hands-on experience.
Part 1: pfSense Firewall Setup & Configurations
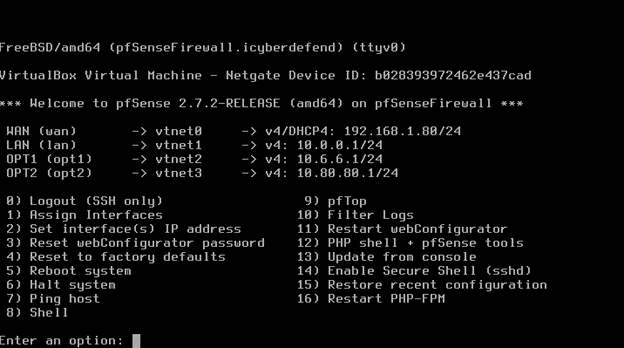
To control and secure network traffic, I configured four virtual network adapters for:
- Wide Area Network (WAN) for external connectivity
- Local Area Network (LAN) for target hosts
- Isolated Subnet for the attack host
- Active Directory Server for centralized authentication
Firewall Installation & Secure Configuration
- Downloaded and extracted the pfSense ISO file using 7-Zip (or any third-party zip tool)
- Installed pfSense on a virtual machine, configuring network adapters for internal and external networking
- Disabled USB and audio interfaces for security best practices
- Hardened the system by disabling unused interfaces and processes
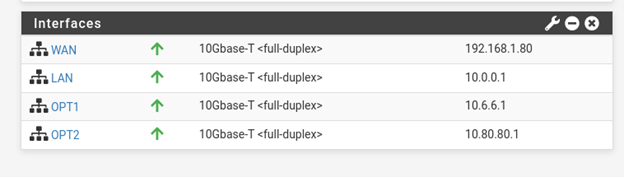
- Configured IPv4 network addressing and subnet masks for each network
- Set up LAN static IPs, then isolated LAN, and finally the Active Directory LAN
- Applied pfSense firewall rules using a Kali Linux VM to prevent exposure to external threats
This setup ensures a secure, scalable, and real-world cybersecurity lab for penetration testing, attack simulations, and advanced network defense training.
Part 2: Configuring Kali VM and pfSense for Secure Network Integration
Attaching the Kali VM to the pfSense LAN before installation ensures it is properly addressed within the internal network. Once Kali GNU was up and running, I immediately changed the root password for security purposes.
After logging into the pfSense web portal, I followed security best practices by:
- Changing the default admin password, then disabling the admin account
- Creating a new user account with admin privileges for better access control
Network and Firewall Configuration
- Updated the hostname and domain name for better network organization
- Disabled Override DNS since the firewall configuration is managed through Kali VM
- Adjusted RFC1918 settings to block private networks
- Disabled WAN blocking since the created WAN is private
- Renamed network interfaces for better organization (e.g., “Isolated” renamed to “Opt1”)
- Enabled DHCP registration and static DHCP to maintain network integrity
- Configured IPv4 addressing for all interfaces as set in Part 1
- Applied prefetch message cache and prefetching DNS keys for optimized performance
With these settings in place, I assigned a static DHCP lease to the Kali VM by entering a specific IP address under the “Static DHCP Mapping on LAN” section. This ensures a stable and controlled network environment, essential for penetration testing, attack simulations, and cybersecurity training.
Configuring Firewall Rules and Network Security in pfSense
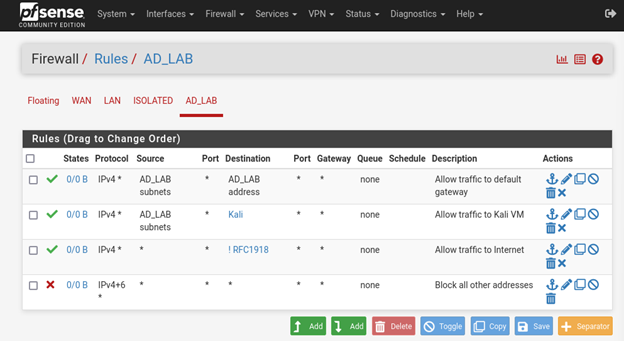
To enhance security, I first implemented an alias for RFC1918 and Kali before applying firewall rules for the Isolated, LAN, and Active Directory hosts to block private addresses.
Network Optimization and Rule Configuration
- Enabled hardware checksum offloading under System > Networking > Network Interfaces to improve performance
- Configured firewall rules to block access to external addresses outside the host OS
- Used the “ip a” command in Kali to retrieve the assigned IPv4 address
- Ensured firewall rules were correctly ordered from top to bottom, placing new private IPv4 addresses above RFC1918 firewall rules
Troubleshooting DHCP Issues
During the configuration, I mistakenly cleared the DHCP leases, which required restoring a previous configuration and waiting for the DHCP lease refresh. To expedite the process, I used the Kali VM CLI to force an IP release and renewal.
This structured approach ensures secure network segmentation while minimizing connectivity issues, allowing for efficient penetration testing and attack simulations in a controlled environment.
Part 3: Deploying Vulnerable Hosts for Penetration Testing
The network includes three vulnerable hosts designed for penetration testing and attack simulations:
- Windows 10 Target Machine (vulnerable build)
- Windows 10 Enterprise Active Directory Build
- Mr. Robot CTF
- Metasploitable 2 (Linux-based penetration testing target)
- DVWA (Damn Vulnerable Web Application)
Isolated Network Configuration and Testing
These virtual environments are deployed within an isolated network interface to prevent unintended exposure. Once configured, I performed the following verification steps:
- Ping testing to confirm connectivity between hosts
- Ensured external address pings failed (error/unreachable responses) to validate network isolation
System Snapshots for Recovery
To prevent data loss or misconfiguration issues, I captured snapshots of each host and the firewall, ensuring a restorable baseline for quick recovery in case of errors.
This structured setup provides a controlled environment for penetration testing, allowing for security assessments without exposing critical systems to real-world threats.
Part 4: Building an Active Directory Environment
To create a robust Active Directory (AD) lab, we first installed Windows Server 2019, which plays a crucial role in managing authentication and access control within the network.
Setting Up the Domain Controller
-
Configuring the Network
- I placed the Kali machine on the same LAN as the AD Lab network to ensure seamless penetration testing.
- I disabled DHCP on pfSense, allowing the domain controller to handle IP distribution.
- Next, I assigned static IPv4 addresses in the network adapter settings.
- To keep things organized, I renamed the server to reflect its role as a domain controller.
-
Installing Active Directory and DNS
- After setting up the network, I installed Active Directory Domain Services (AD DS) and DNS Services to enable directory management.
- I then configured the Enterprise Certificate Authority (CA), keeping the CA Name and private key settings at their defaults.
-
Setting Up DNS Forwarders and DHCP
- Since pfSense serves as the default gateway, I configured it to handle unknown hostnames properly.
- I designated the domain controller’s DNS server as the primary resolver.
- To ensure smooth connectivity, I set up a DHCP server that assigns IP addresses to other AD lab hosts.
-
Finalizing the AD Build
- With the infrastructure in place, I created a domain administrator account to manage the environment efficiently.
- Next, I added multiple user accounts to simulate real-world scenarios.
- Finally, I joined the virtual hosts to the domain controller, successfully forming a functional AD forest.
By following these steps, I built a fully operational Active Directory environment, ready for penetration testing, attack simulations, and AD security assessments.
Part 5: SIEM and Detection Techniques, Section II: Coming Soon
Part 6: Attack Simulation with Detection Techniques, Section III: Coming Soon
Credits:
If you’d like to be a freelance journalist with Cyber News Live email us at contact@cybernewslive.com.